by Amarisco Framing & Mounting Artarmon | Oct 30, 2014
(Image source: https://c2.staticflickr.com/4/3477/3758948453_9139769601_z.jpg?zz=1)
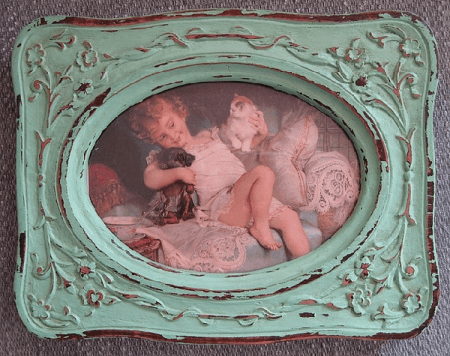
Refinished frames have a lovely aged look about them that not only adds a soft vintage charm to your home interiors but also looks great in virtually all styles of decor.
Old frames can be bought for a little more than nothing from thrift stores, yard and garage sales, flea markets and church sales. Take some time out on weekends and browse through to find some great frames for the perfect refinishing job.
Refinishing a frame will ideally take no more than a few hours. You will end up feeling happy about bringing back a fabulous piece to life which would otherwise have gone to waste.
There are several steps involved in getting a perfect-looking refinished frame. And the first one is bringing home the right frame for the project.
Here are a few tips you can keep in mind when starting out with your refinishing project.
Do not search for the Best Frame
Since you are on a refinishing job you can afford to overlook the minor dents, chips and scratches that you spot on the frame. All these will be practically invisible after you are done with your refurbishing and will in fact add to the unique look.
Chipped or broken glass can be replaced, but a point to note is that differently shaped glasses are higher priced and will cost you more than the regular square or rectangular ones. So when you are out shopping remember that the beautiful oddly-shaped frame will be quite expensive to refinish as compared to the more regular-shaped ones.
Wood Is Your Best Option
Wooden frames look great after they are refinished. Wood is also easy to work on and refinish.
All types of wood whether raw, matted or unfinished will suit perfectly well. When you sand the corners and the ridges, the wooden frames acquire a wonderful distressed look.
So when you are out shopping what you need to look for are chunky wood frames with plenty of detailing.
It is not just the frame that you need to pay attention to. The back of the frame is also equally important. If it is made of wood it will be easy for you to attach hanging hardware like wires and hooks.
The Less Desirable Options You Have
Metal and ceramic frames are not easy if you are looking at a DIY project. There are several laborious steps involved including the difficult task of removing existing paint and rust.
You will also find it difficult to attach hanging hardware to metal frames.
You will also do well to stay away from enamel and glossy finishes because it is very difficult to work in a distressed look. Giving a new finish to these frames will be an uphill task for you.
Laminate frames are also not recommended because they are easier to repaint than refinish.
Sand Away
The first step involved in refinishing is to give a proper sand down to the frame with a fine grit sand paper.
You need to sand thoroughly but remember to keep the rounds, ridges and all the detailing intact.
Once you are done with stripping away the original finish you have a virtually new frame to work on.
Easy Quick Fix for Dents and Chips
The dents and chips in the wooden frame may seem bothersome but you can fix them easily.
The slight scratches and dents can be covered by a dark acrylic paint. It will fill in the scratches and virtually make them invisible.
Tackle the Bigger Dents
For starters you need to clean up the frame thoroughly. You can use an oil soap like Murphy’s to remove stubborn dirt buildup and accumulated grime. Dry the frame and assess the extent of the fill-up job you have on hand.
Use wood putty to build up broken areas and fill dents and pits. You will have to be patient and wait for the putty to dry and adhere before smoothing on a fresh piece.
The chipped corners can be evened out with wood glue. There may be some ornate pieces or attachments that have come loose. Check them properly and use wood glue to fix them in place.
Next Step Is to Paint
Before you splash on the paint give a light sand over to the frame so that the paint will adhere properly.
You can use any paint in two shades so that one colour will be seen through at places when you are done with your distressing/refinishing. Here we are using paints in black and white colours. You can go for either latex or acrylic paint.
Apply a generous coat of black paint on the frame and wait for it to dry.
Use Wax or Vaseline for the Perfect Refinished Look
You need to rub on candle wax or Vaseline over where you want the first coat of paint to be visible. This will prevent the subsequent white coat of paint from sticking too strong to the base coat.
Apply a generous amount of wax or Vaseline petroleum jelly over the ridges and corners, and the ornate areas.
Time for the Top Coat
When you are done with applying the wax, it’s time to put on the top coat of white paint.
Allow the paint to dry completely.
Now carefully rub with a fine sand paper the areas where you have wax beneath. Do so carefully so that you do not remove the underlying coat of paint. The more you sand it the better is the refurbished shabby chic look that you get. Sand it until you are pleased with the look your frame has got.
Seal the Look
The final step is to give a protective coating with clear polyurethane. You can have the clear finish in gloss, semi-gloss or satin sheen. Alternatively you can also use wax to seal in the paint. You can go to the nearest Sydney frame shop and do the final few touch ups before slipping in your family pic.
Conclusion
Refinished frames are a great way to get a chic interior on a happy budget. Refinished or distressed frames sell for big money in decor stores. But with a few hours well spent you can get one for a few dollars or even less. So have fun refinishing!
by Amarisco Framing & Mounting Artarmon | Oct 15, 2014
(Image source: http://inspiringinteriorsideas.com/pictures/2014/09/Stunning-Sports-Memorabilia-decorating-ideas-for-Ravishing-Basement-Eclectic-design-ideas-with-none-.jpg)
Sports memorabilia can really add to the glamor and sophistication of your interior decor. And it’s not just the decor in man caves, your living room can also benefit from some sports therapy.
Our country is one of the most sport-obsessed nations in the world with every true blue Aussie a diehard fan of one sport or the other. Whether it is rugby, motor racing or football there are plenty of ways to incorporate the signed jersey and helmet into your interior decorating ideas without disgusting your wife or girlfriend.
That by no means is to conclude that all sports lovers are male but when it comes to interior decoration women have many more non-sporty ideas than to have a cricket-themed bedroom.
We are passionate about our teams and having a bit of that on display in our interiors will definitely add that special personal touch to our homes, so read on to get some great ‘sporty’ ideas and themes.
Where to Display Your Collection?
Loyalty to teams and jerseys is something that any man would love to showcase in his house. And sports mementoes provide a perfect blend of color and magnetism to chic and contemporary decors.
If your man has an enviable collection that he has built up with love and care over the years there is a strong possibility he will insist on putting up every single piece on the walls of your new home. So how do you go about achieving a happy balance between your dream home and the requirements of your partner?
• Consolidate and Curate
Rather than having framed jerseys, rugby balls and helmets, autographed photos, banners and other memorabilia scattered all round your home, group them in attractive displays in one or two places. Consolidate them appropriately and arrange in an appropriate manner, team-wise or sport-wise, to give each item maximum visual weight and impact.
• Choose Appropriate Rooms for Display
You can choose to display them in the game room, study or living room. Sport-themed decor is especially popular for kid spaces like bedrooms and playrooms.
But, in kids rooms you need to be careful that you do not display any valuable piece or breakable frames and picture glasses. You can hang the jersey of your child’s favorite player, carefully framed with protective acrylic glass which reduces chances of splintering in case it falls off the wall.
Sport-themed wall murals and decals are really hot and trendy in the world of interior designing right now, so do check them out. Wall murals are expensive and should be a long-term investment, so choose color schemes and themes keeping in mind your growing child’s needs. Wall murals look great in adult rooms as well.
• Man Cave Provides the Best Home to the Collection
The concept of man caves is also popular where your man can have a private space of his own where he can show case all his pet projects, toys and gadgets. It’s also a place where he will enjoy spending time with his buddies or throw a party.
A flat screen TV to catch up on all of the latest sporting action and a double-door refrigerator to load up on preferred cold drinks will make it the ultimate haven. Do up the interiors with his sports memorabilia to get a designer-worthy man cave.
If you are space-starved you can consider converting your basement or attic into a sport-themed room. Guest bedrooms can also showcase your love and passion for the sport.
• Quirky Options
If you are in the early stages of doing up your home you can make a few tweaks to your decor plans and find creative places to incorporate the sports memorabilia. Designers speak about converting fishing poles and golf clubs into curtain rods, and other quirky ideas like using tennis balls as curtain rod finials. You can also choose to inlay a glass-topped coffee table with your collection of signed golf balls.
How to House Them Right
If you tack the game shirts to the walls and simply pop the bats and trophies on to shelf racks they will not enhance or contribute to your interiors. For sports memorabilia to look fab as decor items you need to house them properly and display them well.
• Frame Them for Best Results
Autographed jerseys and game shirts are valuable items and need to be displayed safely and appropriately. We offer superior jersey framing services that not only use conservation quality materials and protect your jersey from mold and mildew, dust, dirt and discoloration, but also employ fully reversible techniques. So if any time you feel like taking your jersey out of the frame you can easily do so without any damage to it.
Jerseys are quite big and might take up a big chunk on your wall when framed. But we can work a way out of that as well. We can custom mount the jersey to a board of suitable size so that only the part you want to be visible is seen and the frame will take up lesser space on your wall.
Jerseys are framed in shadow boxes which ensure the fabric does not touch the glass and are protected from any damage due to condensation.
• Glass Display Shelves Add Sophistication
Other valuable memorabilia like game-used or autographed helmets and bats need to be stored in glass display cases like the ones used in stores for high-end jewelry. Floating shelves also prove to be good display options.
Ensure that the display options do not harm or affect the memorabilia adversely in any manner. Keep the items away from direct sunlight, heat and moisture. Properly framed and displayed sports memorabilia can last beautifully for a lifetime or two.
Conclusion
Sport memorabilia add unique charm and endow your home with a distinct personality. When beautifully framed and aptly displayed they are no less than lovely art pieces. So go ahead and make your home rock the sport chic look!
by Amarisco Framing & Mounting Artarmon | Oct 8, 2014
(Image source: http://img0.liveinternet.ru/images/attach/c/1//58/120/58120249_1271957345_1.jpg)
If you own a beautiful, warm and tastefully decorated home you obviously possess art pieces that are not only expensive but are also of much personal significance to you. Art is one décor item that will never go out of fashion and will always look nice in a home no matter how many years have passed by.
Since you are keen to preserve your valuable art pieces for posterity it is better you be aware of all the threats your possessions face even within the safe confines of your home.
Being aware of the dangers will help you take proper precautions and if required, simple remedial steps to resolve the minor damages already done. Art restoration is serious business and other than gentle dusting and damp wiping where advised, no further cleaning or repairing activities should be performed by you.
There have been many instances where valuable artworks were damaged beyond recovery by DIY jobs carried out by ignorant owners.
So ensure your paintings and other art are well looked after and cared for, and educate yourself about the unique needs of your valuables. Read on to find out some really handy tips.
Let There Be Less Light
Exposure to light causes irreversible damage to artworks, especially paintings and photographs. The UV radiation present in the sunlight is the most damaging, causing colors to fade. The organic pigments present in paintings and drawings also become brittle after prolonged exposure to sun.
Another aspect is that the damage from exposure to light is cumulative; it builds up over time and therefore the deterioration of the artwork is a continual process. Natural sunlight is an extremely powerful source of energy and more than UV rays it is the visible spectrum that causes the maximum damage.
The flood of sunlight in your home causes varnishes on paintings to darken altering tonal effects and the overall viewing experience. Watercolor pigments fade in a very short period of time when exposed to full sunlight.
It is not just the paint and the colors that are affected, the structural integrity of the canvas or paper support also gets drastically altered. They are weakened and lose their flexibility. Canvases and paper become discolored and brittle.
It is a common misconception that modern ‘pigments’ and canvases are not affected, but just like old art they too bear the brunt when exposed to harsh sunlight for long.
There is plenty you can do to limit the damage from light to your art.
• Do not hang paintings and photographs exposed to direct or reflected light.
• If your living room is well-lit and you have beautiful art hanging on your walls, ensure you coat your widows with clear UV- film. Use incandescent lights which are less damaging than fluorescent lights.
• We offer great options in picture framing glass which will provide maximum protection to your beautiful art pieces. But it is always the second line of defense.
Control the Humidity and Pressure Variations
Moist conditions have the biggest impact on the life and appearance of all artworks. The natural and organic pigments used in paintings and other art forms have hygroscopic properties. They absorb moisture and swell up, or release moisture and contract based on the humidity in the environment.
Extreme fluctuations in temperature cause changes in the amount of moisture in the atmosphere. Rapid changes in humidity levels place your art under undue stress. Cyclic expansion and contraction causes flaking and cracking of the paint layers. This also causes structural damage to supporting materials.
Heat and humidity also speed up adverse chemicals reactions in paintings.
Another byproduct of moisture buildup in organic paint pigments is mold and mildew infestation. It not only cause disfigurement and discoloration, but can even digest entire artworks including canvases, paper and paints!
• You can do well by hanging your artwork in properly-ventilated rooms.
• Do not store them in airtight cupboards and boxes and forget about them.
• Hang your paintings away from heat and moisture sources like heaters and radiators.
• Do not hang valuable art in kitchens and bathrooms.
• Monitor the temperature and humidity levels in your home and make use of air conditioners and dehumidifiers.
• Check with our local frame shop in Sydney for proper framing techniques suitable in the unique local climate.
Creepies and Crawlies Are Destructive
Dust, dirt and insects like silverfish and borers can completely destroy your paintings and photographs if left unattended for long.
The reasons why they attack your artwork are many. Moist and damp environments, and dust builup encourage insects to grow and thrive on your artwork. Borers will eat wooden picture frames and supporting structures hollow if you do not undertake timely remedial action. Silverfish also gorges on paper and other similar organic stuff found in your artwork.
Ensure the artwork is kept in neat and hygienic places, and allow good air circulation in the rooms. Check for signs of trouble periodically and remediate them immediately.
Good framing techniques will provide adequate protection from insects and dirt accumulation. Insect-resistant backing and other specific techniques will provide your art the required safety.
Improper Framing Techniques Damage Paintings
The right framing techniques ensure the beauty of your art stays intact for years. A well-framed painting will remain beautiful and safe for generations and can outlast almost all other items used to decorate your home interiors.
But if you frame incorrectly it can lead to a total loss of the artwork.
Poor quality backing boards, mats, tapes and adhesives cause irreversible damage to artworks. Ensure you have acid-free mat boards. Linen tapes and other archival quality hinges are great for securing art to the mat board. In addition to acid and lignin-free and conservation quality materials, the picture frame glass also has an important role to play in how well your favorite painting stands the test of time.
We offer several types of UV-protection glasses that ensure your painting can withstand the harmful effects of UV rays and other light sources. Acrylic glass with UV protection is a cheap and viable option for residential use. For more valuable paintings you can go for museum glass.
Conclusion
All artworks require loads of TLC to live for hundreds of years. Keep them away from dampness, moisture and full sunlight exposure. Quality framing and safe display will ensure the best care for your precious art collection.
by Amarisco Framing & Mounting Artarmon | Oct 3, 2014
(Image source: https://c1.staticflickr.com/1/246/524874161_fd054c28b5_z.jpg?zz=1)
Hanging art is an art in itself. The way you put up paintings, posters and photos in your home will greatly affect the overall aesthetic appeal of your home interiors.
Artists and homeowners alike fret over where they will hang their favorite art. The height and the placement, the grouping, the size of the various paintings you put up and the color palette of the art pieces will determine the overall visual effect.
Another very important factor affecting the overall appearance and looks of an artwork is the frame. A well-crafted frame helps draw attention to the art or the painting, and acts as a distinct boundary demarcating it from its surroundings. And as any art lover with an enviable collection of paintings would know, choosing the right frame is also quite a task.
Let’s see how you can hang your lovely paintings and other artwork beautifully to achieve the desired impact.
Choose Your Art Wisely
As they say, the interiors of your home should reflect your personality. So buy your artwork carefully. Have a uniform thread running through them, or in other words, all your paintings should be part of a cohesive whole. None of them should strike a jarring note.
This might seem a bit confusing, but you have the freedom to choose your own narrative. You can select a theme that you really love and enjoy. If you are buying art for your beach house, the theme could be based on the nautical journeys of acclaimed seamen of bygone eras, or the different moods of the sea. If you are a fan of budding talent, build up a collection by emerging artists. Explore what fascinates young artists and find out which theme appeals most to you.
If you are running short of time, you will find it easier to choose art by genre, medium or even color.
Don’t Hang All That You Have Got
If you are a true art lover and have been a diligent collector over the years, you will be tempted to display all that you have got. But refrain from overcrowding your home interiors with your possessions.
They will end up creating clutter on your walls and will make it difficult to focus on or appreciate any piece in particular. Assess your spaces and decide where your cherished art pieces will look the best.
You can also rotate your art occasionally so that you get to enjoy all of it, as well as prevent the art from getting damaged due to constant exposure.
Frame Them Right
Good frames can make even the cheapest print and poster look like valuable art. This works particularly well if you don’t have the big bucks to go shopping in art galleries.
Frames are available in every variety and make. The mats you choose will also have a very important role to play in the overall visual appeal. So frame all those lovely posters you have and create an outstanding collage in your living room.
Throw Some Light
If you want your paintings to be at the center of attention, ensure there is proper lighting to complement them. MR-16 low voltage bulbs and PAR 30 bulbs are popular. Track lighting and recessed lighting with adjustable heads are among the favored lighting options for paintings.
UV rays are damaging to paintings. On prolonged exposure, they cause colors to fade and permanently damage your artwork.
Heat and moisture are also serious threats to the beauty and the longevity of your artwork. So ensure you do not hang your paintings in places where they will be vulnerable like in the kitchen or the bathroom.
Get the Spot Right
It is important you mount your art at the right height. Once you drill a hole into the wall, it would be quite unsightly to remove your painting and put it somewhere else.
If you have standard 8-foot high ceilings, ensure the center of the painting is about 5 feet from the floor.
This is the average human eye-height and your guests would not have to strain to look up or lower their gaze to enjoy the painting.
If you’re hanging the painting behind a sofa, ensure there is a gap of at least 6 inches between the top of the sofa and the bottom of the painting. In other words, in a room where people will be seated for most of the time, you can afford to hang art at a lower height.
Collages Are the Statement Pieces Your Home Needs
Grids or salon-style arrangements are great ways of enhancing the personality of your interior décor. They exude energy and vitality.
Groupings work better in open and spacious rooms than in cramped ones. So if you have a sparse living room or an empty hallway, spice them up with a bright and lively grouping arrangement.
While arranging a collage, trace the outline and cut out templates of each frame on kraft paper. Tape them onto the wall and mimic the pattern you ideally want. Move around the templates until you have attained the symmetry and the arrangement you desire.
Creating the perfect grouping is not difficult. Skim through your favorite personal photographs to find the right ones. Have them professionally framed to get a uniform look. Your framer will also be able to guide you as to which frames to go for to create a unique eclectic look.
Collages are about having fun, so don’t worry too much about getting it all perfect. There is no right or wrong way of putting up salon installations, just ensure you enjoy the end result.
Safety Matters
While hanging your art, ensure you give attention to the safety aspect as well.
Picture hanging hooks are safe and secure, and ensure a flush hang to the wall. A single hook is suitable for art weighing below 30 pounds. Anything above that requires two or even three hooks.
Strap hangers or D-rings are better than picture wires and hang securely from the hooks. In children’s rooms and for high-value art, use security hangers and installations that hold all sides of the frame firmly to the wall. You need to unlock the installation with a special key tool to be able to remove the art from the wall.
Conclusion
When mounting art, safety, aesthetics and convenience need to be taken into account. Also you need not worry if you messed up the first time. It is easy to fix the problem with a little spackle. So go ahead and have some fun with your art.